About our project » History » Revision 24
« Previous |
Revision 24/25
(diff)
| Next »
Anderson PHILLIP, 11/08/2025 01:36 AM
Project Details
Overview
The goal of this project is to create a unified display by merging two projector images into one.
To achieve this, we employed techniques such as gamma correction, alpha blending, and intensity adjustments to refine the final output.
- Project Manager
- Team Leader
- Doxygen Documentation Team
- Wiki Team
- Coding Team
- UML Design Team
Software and Tools
| Tool | Description |
|---|---|
| Redmine | Used to manage project tasks, track progress, and organize team activities. |
| Python | Utilized for image processing operations such as blending, gamma correction, and intensity adjustments. |
| → OpenCV | A Python library for computer vision and image processing operations. |
| → numpy | A Python library that supports image processing operations with numerical computation functions. |
| → json | A built-in Python library for reading and writing JSON configuration files used in video and image processing. |
| → tkinter | A built-in Python library for creating the GUI and supporting interactive interface operations. |
| Doxygen | Employed to generate detailed code documentation automatically. |
| Astah | Used to design and visualize UML diagrams representing the system’s structure and workflow. |
Technology
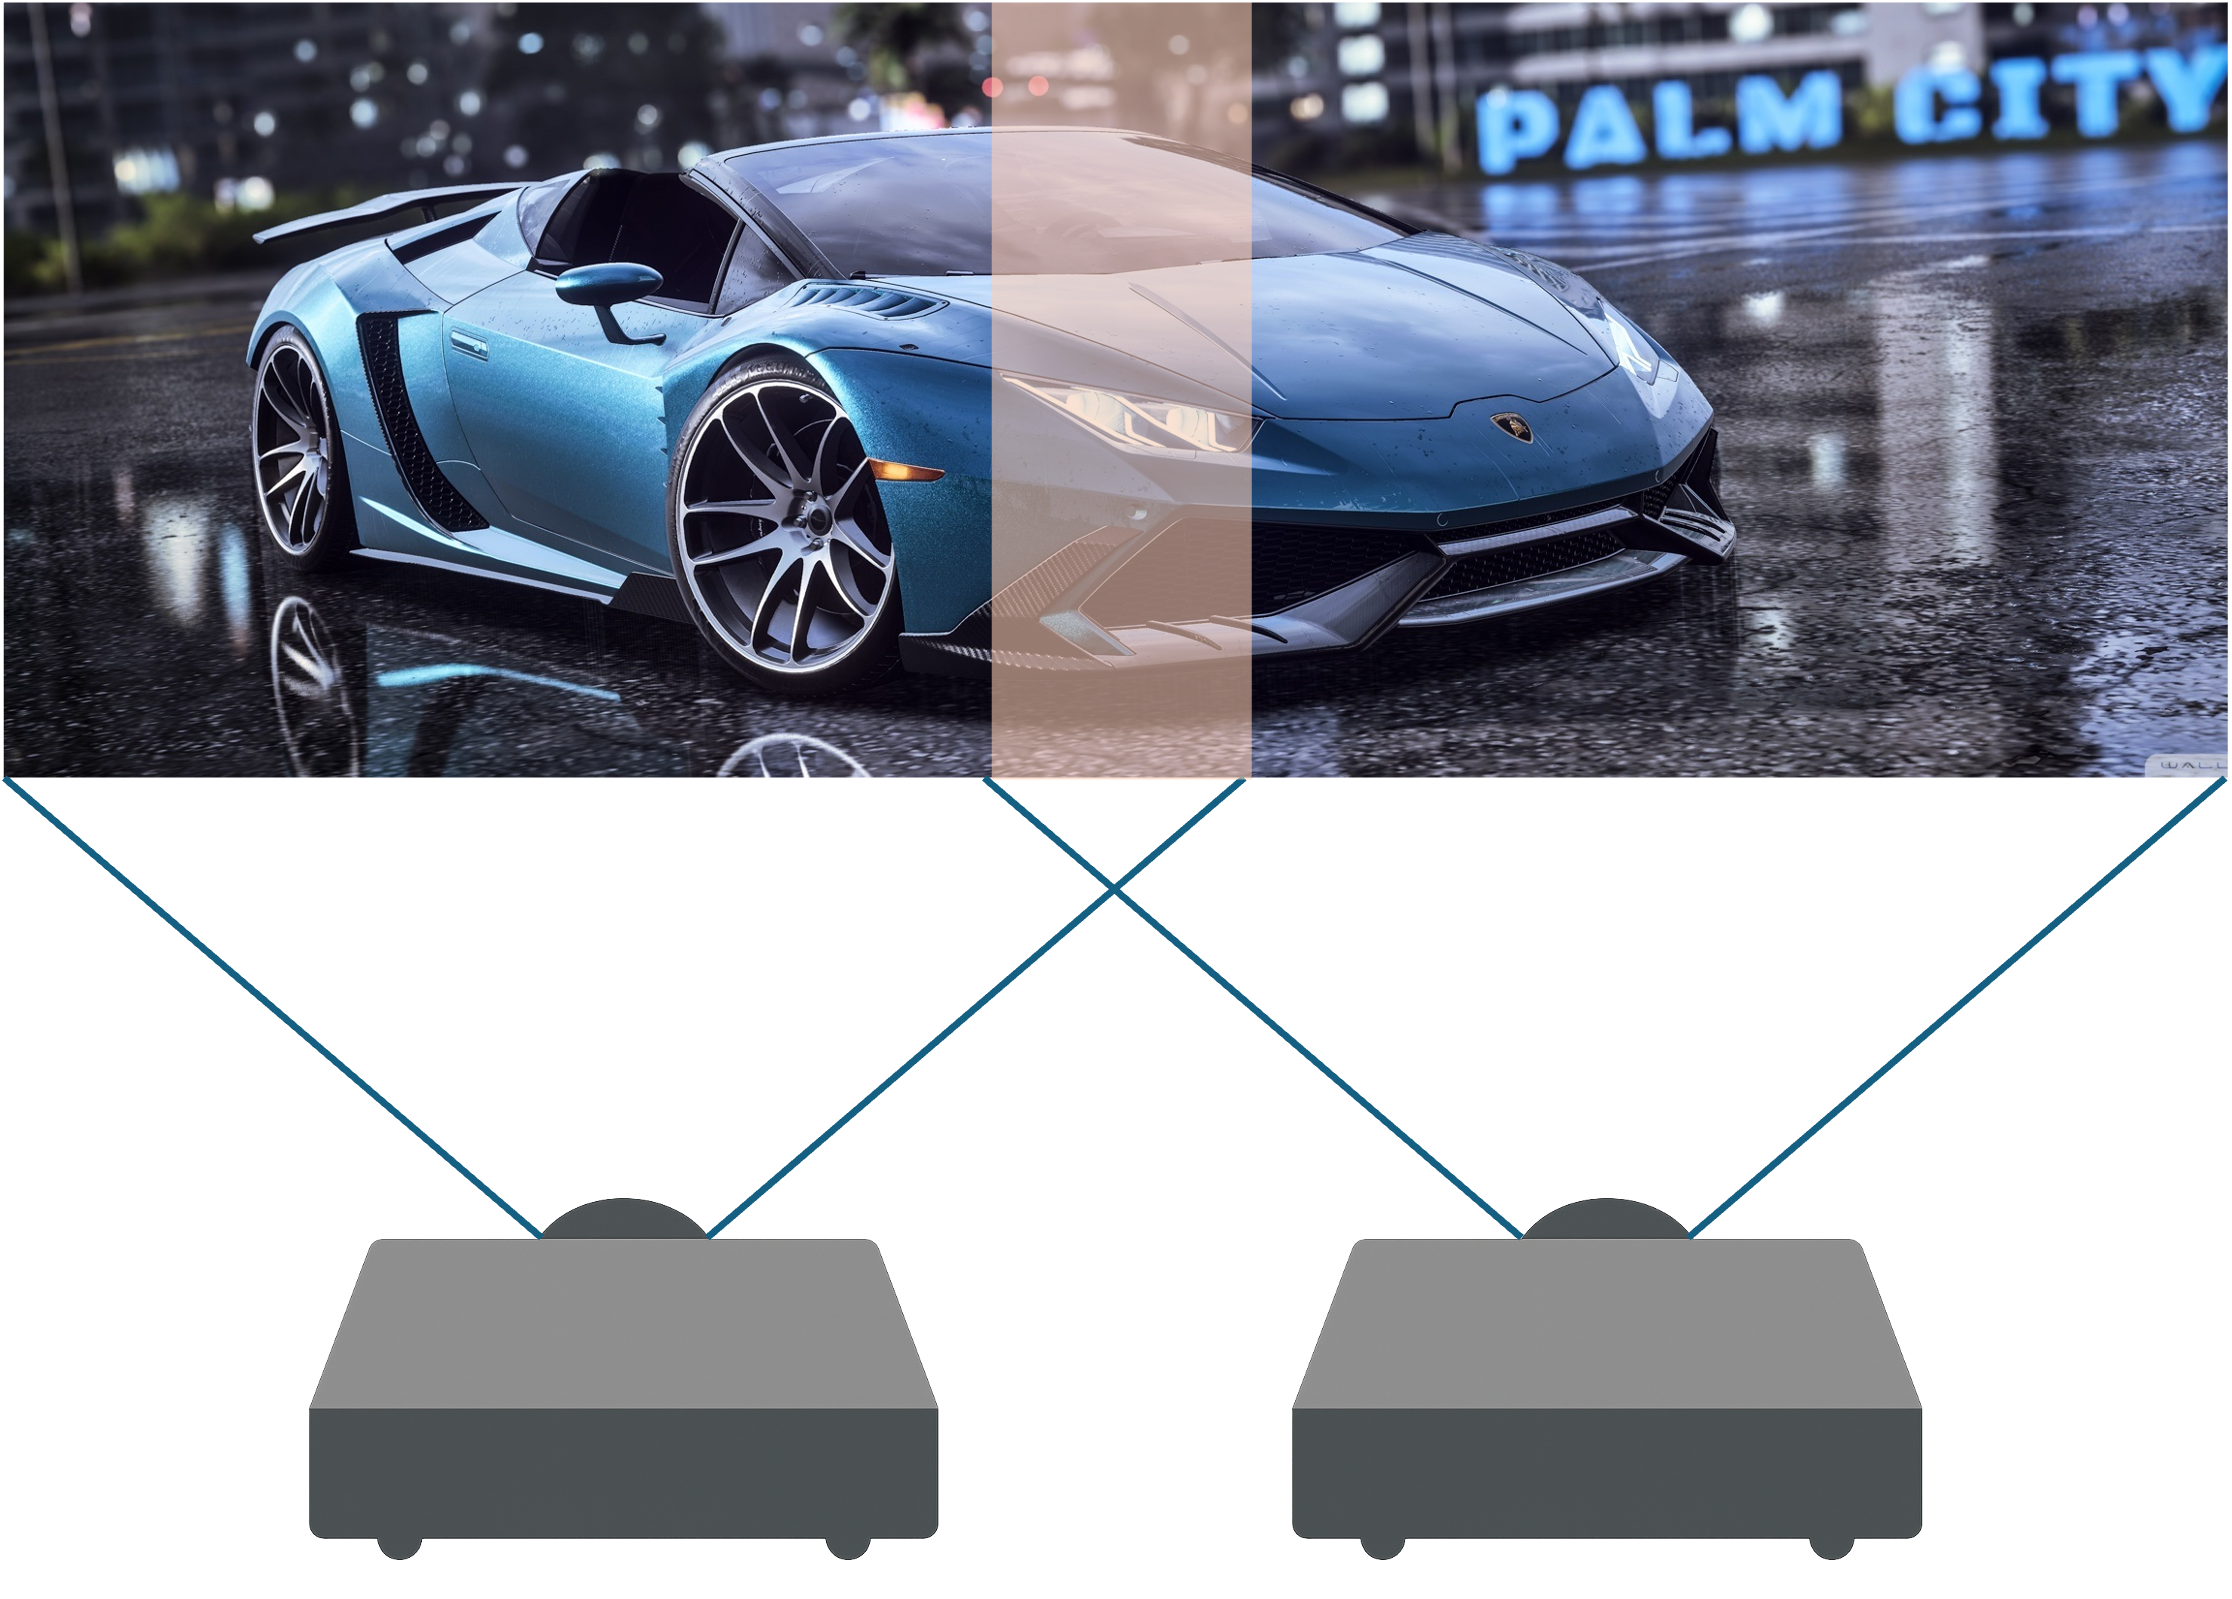
We plan to use a single flat-screen display illuminated by two projectors connected to separate computers, allowing both images to be projected simultaneously and combined into one seamless image.
To accomplish this, we will apply:- Gamma correction method
- Alpha blending
- Intensity modification
Alpha Blending Method
Alpha blending merges two images using a specific alpha value that determines transparency levels.
This process is crucial in rendering and game development for combining visual elements smoothly and reducing jagged edges.
- Tkinter – for the graphical interface
- OpenCV – for image manipulation
- PIL – for image rendering
Users can load configuration files, apply gamma correction and alpha blending, and view/save the processed images.

Interactive Alpha Blending Simulator
To visualize how alpha blending and gamma correction affect overlapping regions, we developed an interactive simulator.
This tool allows users to modify blending parameters (Alpha A/B, Gamma, and Color) and observe real-time blending behavior between two projected regions.
Access the simulator here:
Alpha Blending Simulator
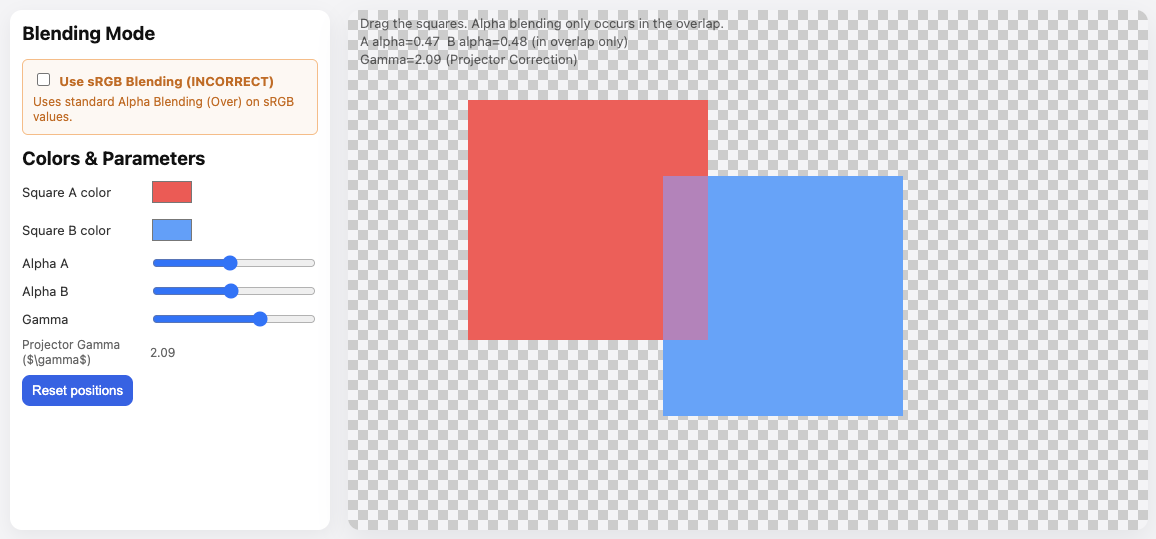
This simulator was developed by a team member as a supporting tool to demonstrate the blending principle used in our project.
External reference:
[https://takinginitiative.net/2010/04/09/directx-10-tutorial-6-transparency-and-alpha-blending/]
Gamma Correction Method
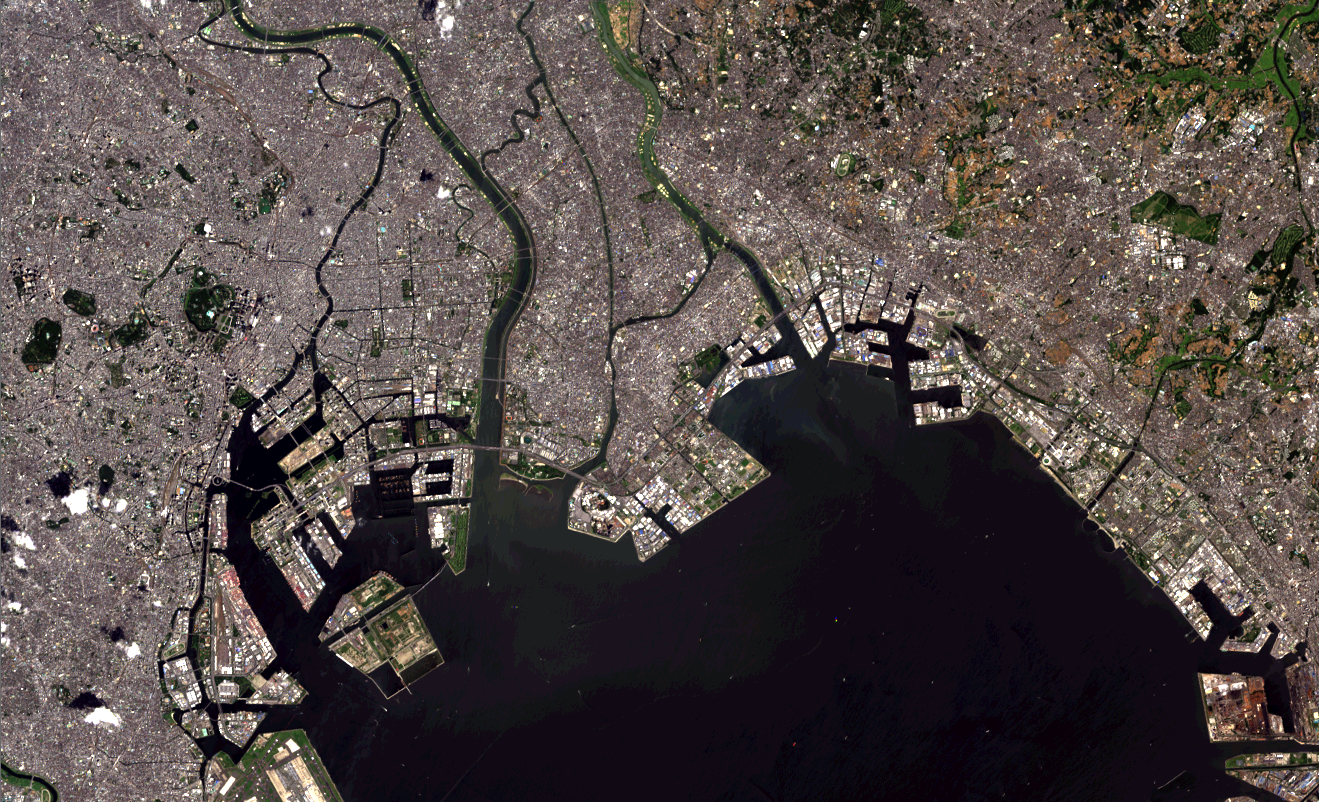
This project uses a technique known as gamma correction , which modifies an image’s brightness by adjusting the luminance of each pixel in a non-linear way. This method aligns image brightness with human visual perception , as the human eye is more sensitive to variations in darker tones than in brighter ones. This biological adaptation allows us to see effectively across a wide range of lighting conditions. Gamma correction applies a power-law transformation to pixel values, as represented by the following equation:

When the gamma value (γ) is greater than 1, the image appears darker; when it is less than 1, the image appears brighter.
Note: Since pixel intensity values range between 0 and 255, the process involves first normalizing the image (dividing by 255), then applying the power function using the specified gamma value, and finally scaling the result back to the original 0–255 range.
[Case1: γ=1.0(Before Gamma Correction)]
External reference:
[http://rs.aoyaman.com/seminar/about10.html]
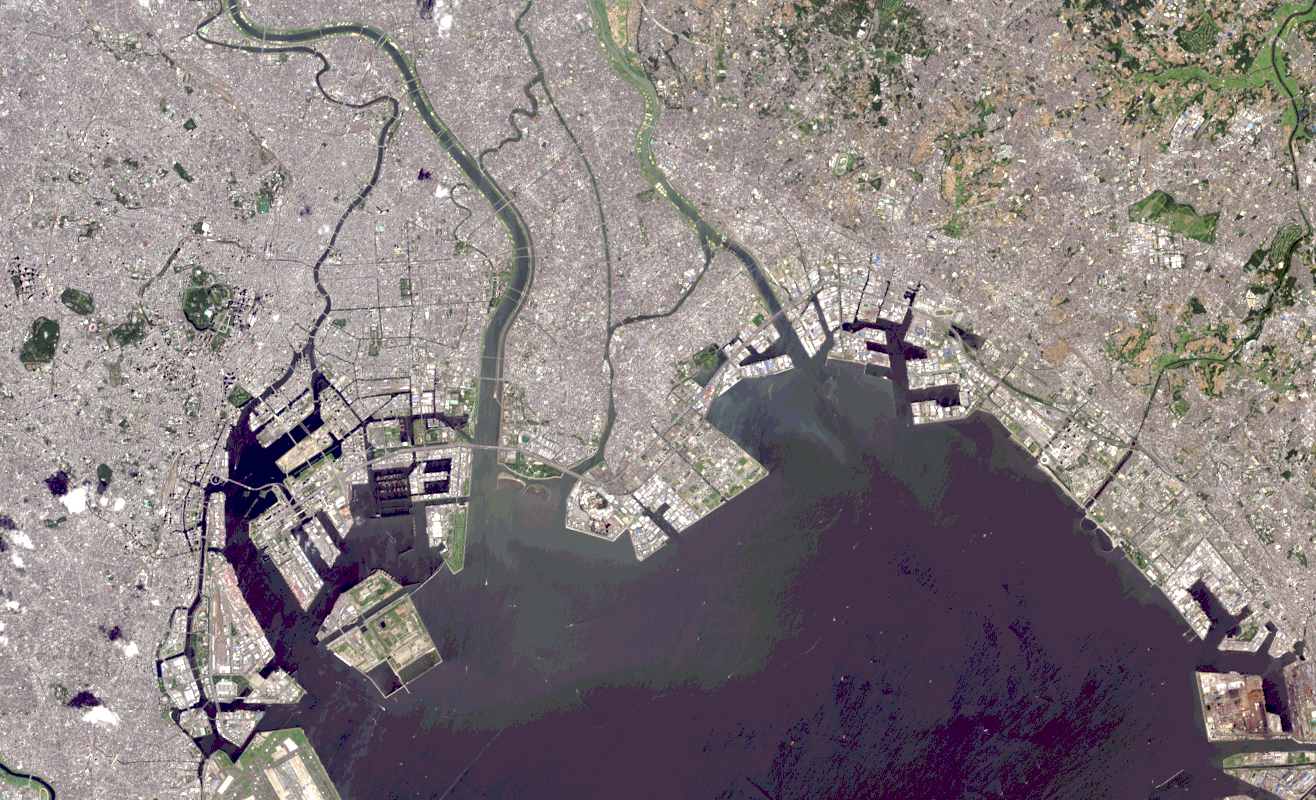
[Case2: γ=0.8(After Gamma Correction)]

External reference:
[http://rs.aoyaman.com/seminar/about10.html]
[Case3: γ=2.0(After Gamma Correction)]
External reference:
[http://rs.aoyaman.com/seminar/about10.html]
Intensity Modification
This method adjusts brightness at image edges using gamma correction and alpha blending depending on image_side value:- image_side = 1 → intensity decreases toward the left edge
- image_side = 0 → intensity decreases toward the right edge
By combining gamma correction and alpha blending, the method produces a smooth fading effect along the edges, allowing the image to blend seamlessly with the background or another image.
Transparency
Gradient Mask Creation
- The create_mask() method (in MaskCreator class) generates a smooth transparency gradient using the smoothstep function.
- This gradient determines the transparency level across the masked region, providing a non-linear transition from fully transparent to fully opaque (or vice versa).
- The smoothstep function is used to ensure a gradual and visually smooth change in opacity, minimizing harsh edges.
Transparency Factor
- The transparency_factor parameter scales the gradient values, directly influencing overall transparency.
- Lower values = more transparent; values closer to 1 = higher opacity.
Alpha Blending
- The alpha_blending() method applies the alpha gradient to the image within a defined Region of Interest (ROI).
- Blending follows the equation:
blended = (α × ROI) + (1 − α) × background
where:
(α × ROI): applies the transparency gradient to the image
(1 − α) × background : ensures a gradual transition into the black background.
Transparency Side Control
- The direction of the gradient depends on image_side:
Right side → gradient applied as-is
Left side → gradient reversed
By combining the smoothstep gradient, transparency factor scaling, and alpha blending, this method enables precise control of transparency on the desired side of
the image, producing a seamless blending effect.
Limitations and Possible Enhancements (WIP)
Limitations
- The current prototype mainly works with static images, so live video blending or projected alignment adjustments can be limited.
- Edge blending only supports left or right sides. Vertical or diagonal blending is not available, which limits flexibility in projector setups.
- The current prototype does not support automated calibration or geometric correction, so all alignment between two projectors must be manually handled.
- The current prototype expects identical projector usage, so any mismatch in projector properties (birghtness, contrast, color tone) can result in visible seams or image inconsistencies.
- The current prototype uses fixed input file names, requiring it to be manually changed.
Possible Enhancements
- Implement the ability to adjust parameters like gamma, blend width, and gradient method dynamically in the GUI without restarting the program
- Support for multiple video codex, resolutions, and output formats
- Expand edge blending to include top, bottom, and diagonal sides
Updated by Anderson PHILLIP 5 months ago · 24 revisions